Data import/export framework user guide (AX 2012)
Various versions of the Data Import/Export Framework are available. The version that you use depends on the version of Microsoft Dynamics AX that you run in your environment:
- For Microsoft Dynamics AX 2012 R3, use the version of the Data Import/Export Framework that is included in that release.
- For Microsoft Dynamics AX 2012 R2, use the version of the Data Import/Export Framework that is available in cumulative update 7 for Microsoft Dynamics AX 2012 R2.
- For AX 2012 or Microsoft Dynamics AX 2012 Feature Pack, use the version of the Data Import/Export Framework that is available from the Lifecycle Services Downloadable Tools (formerly on InformationSource).
Note The versions of the Data Import/Export Framework in cumulative update 7 and Microsoft Dynamics AX 2012 R3 include functionality that is not available in the version that is available for download from LCS. For more information, see Migrating data using the Data import/export framework (DIXF, DMF).


Various versions of the Data Import/Export Framework are available. The version that you use depends on the version of Microsoft Dynamics AX that you run in your environment:
- For Microsoft Dynamics AX 2012 R3, use the version of the Data Import/Export Framework that is included in that release.
- For Microsoft Dynamics AX 2012 R2, use the version of the Data Import/Export Framework that is available in cumulative update 7 for Microsoft Dynamics AX 2012 R2.
- For AX 2012 or Microsoft Dynamics AX 2012 Feature Pack, use the version of the Data Import/Export Framework that is available from the Lifecycle Services Downloadable Tools (formerly on InformationSource).
| Note |
|---|
| The versions of the Data Import/Export Framework in cumulative update 7 and Microsoft Dynamics AX 2012 R3 include functionality that is not available in the version that is available for download from LCS. For more information, see Migrating data using the Data import/export framework (DIXF, DMF). |
Architecture
The following diagram shows the architecture of the Data Import/Export Framework.
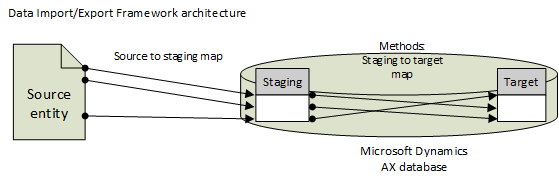
The Data Import/Export Framework creates a staging table for each entity in the Microsoft Dynamics AX database where the target table resides. Data that is being migrated is first moved to the staging table. There, you can verify the data, and perform any cleanup or conversion that is required. You can then move the data to the target table or export it.
The Import/Export Process
The following diagram shows the steps that are required to import or export data in Microsoft Dynamics AX. 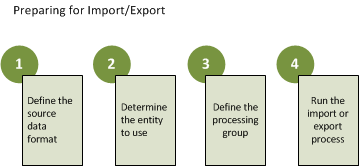
- Determine the source of the data to export or import, and create a source data format for the data. For export, the source is AX. For import, you can use any of the following sources:
- AX – Import data from another Microsoft Dynamics AX instance.
- ODBC – Import data from another database, such as Microsoft SQL Server or Microsoft Access.
- File – Import data from a fixed-width or delimited text file, XML file, or Microsoft Excel file.
For more information about how to create a source data format, see Migrating data using the Data import/export framework (DIXF, DMF). - Determine which entity to associate with the data. This entity is either the source of the export data or the target for the import data. You can use an existing entity or create a custom entity. For a list of available entities, see Data import/export framework entities (DIXF, DMF). For information about how to create a custom entity, see Create a custom target entity for the Data import/export framework (DIXF, DMF).
- Determine which entities should be imported or exported together, and put all these entities in a processing group. A processing group is a set of entities that must be processed in a sequence, or that can logically be grouped together. The entities in a processing group are exported together, or they are imported together from source to staging and then from staging to target. In a processing group, you also associate each entity with a source data format. For more information about how to create a processing group, see Migrating data using the Data import/export framework (DIXF, DMF).
- Use the processing group options to either import or export data. For import, you first import the data to a staging table, where you can clean or transform the data as you require. You should validate that the data appears accurate and that the reference data is mapped correctly. You then migrate the data from the staging table to the target table. You should validate that the entity appears accurate in the target table.
Important The staging data might contain business information. Therefore, we strongly recommend that you delete the staging data after the migration is completed. For export, you also move the data from the source to a staging table, where you can clean or transform the data as you require. You then export the data either to Microsoft Dynamics AX or to a file. The first option creates a .dat file and a .def file for the data so that it can be imported into another Microsoft Dynamics AX instance. The second option creates a flat file for the data.


No comments:
Post a Comment