Tuesday, April 28, 2015

How to filter the gird based on the given input in ListPageForm

Filtering the grid based on the given purchase order in the Listpage:-

In ListPage we don't have override method. In order to filter the data based on the given input in the field and If you want to initialize some value to the field and based on that you want the grid to display.

When ever a ListPage Form is Opened, initializeQuery() method on the ListPageInteraction class is called.

In order to filter the grid based on the given input in the Listpage form you need to override the initializeQuery() method.

Scenario :- Take a input field in the PurchTableListPage form and based on the Purchase Order entered in the field it should display the grid.

 It can be achieved by adding the below code.

Add the below code in initializeQuery() method :-

/* actually we are making a range value empty so that when you open the listpage form the grid will be empty */

else
   {
       _query.dataSourceTable(tableNum(PurchTable)).addRange(fieldNum(PurchTable, PurchId)).value(SysQuery::valueEmptyString());
   }


Now add the below code to the modified method of the Field based on which you want the grid to be filter

public boolean modified()
{
    boolean ret;
    ret = super();
    PurchaseTable_ds.queryBuildDataSource().clearRanges();

   /*filtering the grid based on the given purchase order */

   if (this.valueStr() != '' )
   {
       PurchaseTable_ds.queryBuildDataSource().addRange(fieldNum(PurchTable, PurchId)).value(this.valueStr());
       PurchaseTable_ds.executeQuery();
   }

 /* if the input field is empty we are changing the range from PurchId to RecId and searching for RecId with a value "0", which is always not present. This will help you to show an empty grid whenever user enter a null value and search for the list*/  

   else
   {
       PurchaseTable_ds.queryBuildDataSource().addRange(fieldNum(PurchTable, RecId)).value("0");
       PurchaseTable_ds.executeQuery();
   }

   return ret;

}

Monday, April 27, 2015

Find and Exists Method in AX

Find :-

All tables should have at least one find method that selects and returns one record from the table that matches the unique index specified by the input parameters.

The last input parameter in a find method should be a Boolean variable called 'forupdate' or 'update' that is defaulted to false. When it is set to true, the caller object can update the record that is returned by the find method.

See the next example from the InventTable:

static InventTable find(ItemId itemId, boolean update = false --->to define how many primarykeys in table)
{
InventTable inventTable;
;
inventTable.selectForUpdate(update);
if (itemId)
{
select firstonly inventTable -->table name
index hint ItemIdx -->index name
where inventTable.ItemId == itemId;
}
return inventTable;
}

Exists :-

As with the find method, there should also exist an exists method.
It basically works the same as the find method, except that it just returns true if a record with the unique index specified by the input parameter(s) is found.

In the next example from the InventTable you can see that it returns true if the
input parameter has a value AND the select statement returns a value.

static boolean exist(ItemId itemId)
{
return itemId && (select RecId from inventTable
index hint ItemIdx
where inventTable.ItemId == itemId
).RecId != 0;
}

Thursday, April 23, 2015

How to Browse a File in Form Using X++ in AX 2012

Follow the below step to add  Browse Functionality in Form

Step1:-  Create a Form
            > Add a StringEdit in Design
            >Assign a EDT Property as FilenameOpen

Step 2:-
           Add the below Methods to the form in order to complete the functionality

  FilenameFilter filenameLookupFilter()
{
    #file
    return [WinAPI::fileType(#xpo), #allfilesName+#xpo, #allFilesType, #allFiles];
}
-----------------------------------------------------------------------------------------------------------
str filenameLookupTitle()
{
    return "Select a trade agreement to import";
}
------------------------------------------------------------------------------------------------------------

str filenameLookupInitialPath()
{
    return "";
}
-------------------------------------------------------------------------------------------------------------

str filenameLookupFileName()
{
    return "";
}
----------------------------------------------------------------------------------------------------------------

All Done !!!!!!!!!
Now you can browse the file in Form

Method 2 :-

Step 1:-  Create a Form
            > Add a StringEdit in Design
            >Assign a EDT Property as FilenameOpen

Step 2:- Override the Lookup method on StringEdit Control.

public void lookup()
{
    FilenameOpen    file;
    Filename        path;
    Filename        name;
    Filename        type;
    #File

    file = WinAPI::getOpenFileName(element.hWnd(),[WinAPI::fileType(#xlsx),#AllFilesName + #xlsx],path,'Select ...',"",name + type);
    if(file)
    {
        StringEdit.text(file);
    }
}


How to select a file using Browse Button in dialog box in AX 2012

/*
Below code will help you to select the file in the dialog box using Browse Button.
*/


static void Esh_FileOpen(Args _args)
{

Dialog dialog;
DialogField dialogField;
Filename filename;
;

dialog = new Dialog('FileOpen');
dialogfield = dialog.addField(extendedTypeStr(Filenameopen), 'File Name');
dialog.run();

if (dialog.run())
{
filename = (dialogfield.value());
}

info(filename);

}

Creating Workflow in AX 2012

Microsoft Dynamics AX provides workflow functionality that you can use to ensure that documents are processed and approved in a consistent and efficient manner.

A workflow represents a business process. A workflow defines how a business document flows through the system by indicating who must process and approve it.


Creating Workflow in AX 2012
  • Configure how the workflow engine is executed on a server.
  • Specify which application module a workflow is applicable to using a workflow category.
  • Link tables to workflows using a query.
  • Create a new workflow type.
  • Apply a workflow to a form.
  • Define what happens when the workflow is approved or denied.
  • Create Event Handlers and apply them to a workflow.
  • Configure a workflow.


In Microsoft Dynamics AX, you define a workflow by creating a workflow type to base the workflow on. In this walkthrough, you will create a workflow type in the AOT that you can add approvals and tasks to.
A workflow type defines information about the following:
  • Which document is being used with the workflow. The workflow document exposes calculated fields and identifies the query that exposes data fields for the workflow.
  • Tasks, automated tasks, and approvals that can be configured by the end user.
  • Workflow categories used for assigning a workflow type to a specific module.
  • Menu items and event handlers.
This walkthrough illustrates the following tasks:
  • Creating a query for a workflow.
  • Creating a workflow category.
  • Creating a workflow type in the AOT.
  • Adding code to the SubmitManager class.

To Create a Query for a Workflow

  1. In the AOT, right-click the Queries node, and then select New Query. A query group displays under the Queries node.
  2. Right-click the new query, click Rename, and then enter MyQuery.
  3. Expand the new query, right-click the Data Sources node, and then click New Data Source. A data source group displays under the Data Sources node.
  4. Right-click the new data source group and then click Properties.
  5. In the Properties sheet, set the Table property to CustTable.
  6. Expand the CusTable_1 data source, and select the Fields node. In the Properties sheet, set the Dynamic property to Yes.
    Note :-

    By setting the Dynamic property to Yes, all data fields in the CustTable table are exposed for workflow conditions. To remove data fields, set the Dynamic property on the Fields node of the data source to No. Expand the Fields node, right-click a field, and then click Delete. If the query is not saved, the Delete command is not available.                                                                                                                                                                                                                                                                    
  7. In the AOT, right-click MyQuery, and then click Save.
After a Microsoft Dynamics AX query is created, you must decide which category the workflow will be part of. We recommend that you choose an existing workflow category. If no category is appropriate, you can create your own.

To Create a Workflow Category

  1. In the AOT, expand the Workflow node.
  2. Right-click the Workflow Categories node, and then select New Workflow Category. A new workflow category group displays under the Workflow Categories node.
  3. Right-click the new workflow category and then click Properties.
  4. In the Properties sheet, set the following properties:
    Property
    Value
    Name
    MyWorkflowCategory
    Module
    Customer
  5. In the AOT, right-click MyWorkflowCategory, and then click Save.
After a workflow category is created, you are ready to create the workflow type.

To Create a Workflow Type in the AOT

  1. In the AOT, expand the Workflow node.
  2. Right-click the Workflow Types node, and then click Add-Ins > Workflow type wizard. The Workflow wizard is displayed. This wizard will help you create a new workflow type.
  3. Click Next.
  4. Set the following values for the wizard.
    Value
    Input
    Name
    Enter MyWorkflowType.
    Category
    Choose MyWorkflowCategory, which is the category that you created.
    Query
    Choose MyQuery, which is the query that you created.
    Document menu item
    Choose CustTable, which points to the main form for displaying customer data.
    Document web menu item
    Choose EPCustTableInfo, which points to the main page for displaying customer data in Enterprise Portal.
  5. Click Both to generate menu items for both the Microsoft Dynamics AX client and Enterprise Portal.
  6. Click Next. A list of all of the resources that will be created for the workflow type is displayed.
  7. Click Finish to create the resources. The wizard will create classes, menu items, web menu items, the workflow type, and a project that contains all of the items.
  8. A dialog box will be displayed that indicates the status. Click OK. The project that contains the workflow type resources is displayed.
After the workflow type is created, you will add code for the workflow events. However, to simplify this walkthrough, you will not add code to any of the event handlers.
To enable end-users to submit a workflow document for approval, you will have to add code that is run when the user clicks Submit in Microsoft Dynamics AX. The main method in the SubmitManager class that was created by the Workflow wizard will run. This code will display a message in the user interface that indicates that the document was submitted to workflow.

To Add Code to the SubmitManager Class

  1. In the AOT, expand the Classes node.
  2. Locate the MyWorkflowTypeSubmitManager class. This was the class created by the Workflow wizard.
  3. Expand the MyWorkflowTypeSubmitManager class, and then double-click the main method. The Editor window opens.
  4. In the Editor window, insert the following code.
    public static void main(Args args)
    {
        // Variable declaration.
        recId _recId = args.record().RecId;
        WorkflowCorrelationId _workflowCorrelationId;
        // Hardcoded type name
        workflowTypeName _workflowTypeName = workFlowTypeStr("MyWorkflowType");
        // Initial note is the information that users enter when they
        // submit the document for workflow.
        WorkflowComment _initialNote = "";
        WorkflowSubmitDialog workflowSubmitDialog;
    
        // Opens the submit to workflow dialog.
        workflowSubmitDialog = WorkflowSubmitDialog::construct(args.caller().getActiveWorkflowConfiguration());
        workflowSubmitDialog.run();
    
        if (workflowSubmitDialog.parmIsClosedOK())
        {
               _recId = args.record().RecId;
            // Get comments from the submit to workflow dialog.
            _initialNote = workflowSubmitDialog.parmWorkflowComment();
    
            try
            {
                ttsbegin;
    
                // Activate the workflow.
                _workflowCorrelationId = Workflow::activateFromWorkflowType(_workflowTypeName, _recId, _initialNote, NoYes::No);
    
                // Send an Infolog message.
                info("Submitted to workflow.");
    
                ttscommit;
            }
    
            catch(exception::Error)
            {
                info("Error on workflow activation.");
            }
        }
    }
    
    
  5. Close the Editor window and then click Yes to save changes.
  6. Any time that you create or modify workflow code, you must regenerate the CIL code. In the AOT, right-click AOT, click Add-Ins, and then select Incremental CIL generation from X++.
After MySubmitToWorkflowClass is created, you can create an action menu item to bind this class to.

To Enable a Form for Workflow

  1. In the AOT, expand the Forms node.
  2. Expand the CustTable form, and then expand the Designs node.
  3. In the Designs node, right-click the Design child node, and then click Properties.
  4. In the Properties sheet, set the following properties.
    Property
    Value
    WorkflowEnabled
    Yes
    WorkflowDataSource
    CustTable
    NoteNote
    This is the root data source specified in the query used for the Document property on the MyWorkfowType type. For more information, see Walkthrough: Creating a Workflow Type.
    WorkflowType
    MyWorkflowType
  5. In the AOT, right-click the CustTable form, and then click Save.
After the form is enabled for workflow, you will add a canSubmitToWorkflow method to the form. This method runs before the Submit button is enabled to verify that the workflow document is in a valid state to submit to workflow. When this method returns true, the Submit button is enabled. An alternative is to add the canSubmitToWorkflowmethod to the main table for the form. This allows both the Microsoft Dynamics AX client and Enterprise Portal to share the same logic to determine whether workflow is enabled.
NoteNote
If there are no records in the data source and the canSubmitToWorkflow method returns true, an exception is thrown. Therefore, you should programatically check for a record when you evaluate the state of the workflow.

To Create a Method to Indicate Whether the Current Document can be Submitted to Workflow

  1. In the AOT, expand the CustTable form, right-click the Methods node and then point to Override method. Click canSubmitToWorkflow.
  2. A method node named canSubmitToWorkflow displays under the Methods node and the Editor window opens.
  3. In the Editor window, enter the following code to enable the Submit button on the form for workflow.
    public boolean canSubmitToWorkflow()
    {
        // ToDo This method always returns true and the Submit
        // button will always be displayed on the form. Enter code
        // here to only return true when the document is NotSubmitted.
        // Also, add code to check if a record exists in the data source.
        return true;
    }
    
  4. Close the Editor window and then click Yes to save changes.
Now that the form is enabled for workflow, you must create a workflow configuration to display the Submit button on the workflow toolbar.

To Create a Configuration

  1. In Microsoft Dynamics AX, click Accounts receivable > Setup > Accounts receivable workflows. The Accounts receivable workflows list is displayed.
  2. In the Accounts receivable workflows list, click New. The Create workflow form is displayed.
  3. On the Create workflow form, select MyWorkflowType, and then click Create workflow. The workflow configuration form is displayed.
  4. In the action pane, click Properties. The Properties form is displayed.
  5. In the Properties form, click Basic Settings. In the Submission instructions text box, enter My workflow submit instructions., and then click Close.
  6. In the MyWorkflowType form, create a simple workflow by dragging a Conditional decision onto the workflow in between the Start and End nodes. Drag a line from the Start node to the Conditional decision 1 node. Then, drag a line from the True output of the Conditional Decision 1 node to the End node. Finally, drag a line from the False output of the Conditional decision 1 node to the End node.
    TipTip
    You may need to scroll down in the workflow designer form to see the End node.
  7. Right-click Conditional decision 1, and select Properties. The Properties form opens.
  8. In the Conditional tab, click Add condition, and then enter Where Customers.Account number contains value 0.
  9. Click Close.
  10. In the workflow designer form, click Save and close. Enter Workflow Walkthrough in the Version notes field and click OK.
  11. The Activate workflow – MyWorkflowType form appears. In the Activate workflow – MyWorkflowType form, select Activate the new version, and then click OK.
  12. Display the Accounts receivable area page.
  13. Click Customers > All customers.
  14. Double-click one of the customers in the list. The Customers form is displayed.
  15. The workflow toolbar is displayed at the top of the CustTable form. Click the View Workflow Instructions icon on the workflow toolbar to display the submission instructions that you created in this walkthrough.
  16. Click MyWorkflowTypeSubmitMenuItem, which is the menu item that you created to submit the customer to workflow. Supply a submission comment and then clickMyWorkflowTypeSubmitMenuItem to see the submitted to workflow Infolog message.

Source :-https://msdn.microsoft.com/EN-US/library/cc641259.aspx

Importing Data from Excel Sheet to Table in AX 2012

Importing Data from Excel Sheet to Table in AX 2012

static void Esh_ImporttoExcelProductType(Args _args)
{
SysExcelApplication application;
SysExcelWorkbooks workbooks;
SysExcelWorkbook workbook;
SysExcelWorksheets worksheets;
SysExcelWorksheet worksheet;
SysExcelCells cells;
COMVariantType type;
Name name;
FileName filename;
Esh_SampleTable esh_sampletable; //Declaring Table Name
int row;
str _productTypeId;
str _productType;
str _description;
;

application = SysExcelApplication::construct();
workbooks = application.workbooks();
//specify the file path that you want to read
filename ='D:\\Test.xlsx'; //ExcelSheet File Name
try
{
workbooks.open(filename);
}
catch (Exception::Error)
{
throw error('File cannot be opened');
}

workbook = workbooks.item(1);
worksheets = workbook.worksheets();
worksheet = worksheets.itemFromNum(1); //Here 1 is the worksheet Number
cells = worksheet.cells();
do
{
row++;
_productTypeId = any2str(cells.item(row, 1).value().toString());
_productType = cells.item(row, 2).value().bStr();
_description = cells.item(row, 3).value().bStr();

esh_sampletable.ID = _productTypeId;
esh_sampletable.Type = _productType;
esh_sampletable.Description = _description;
esh_sampletable.insert();

type = cells.item(row+1, 1).value().variantType();
}
while (type != COMVariantType::VT_EMPTY);
application.quit();
info("Data is Imported");
}


Thursday, April 16, 2015

Sales Order (Confirmation, Picking list, Packing slip, Invoice ) -- Classes and Tables


Creating Sales Order
-------------------------

Classes :- SalesTableType and SaleslineType classes  will get called while creating the orders.
Tables  :- Sales Table, Logistics Postal Address, CustTable, MCRPrimaryAddressCust,SalesLine.

Confirmation
--------------------
Classes :- SalesFormLetter class

Tables  :- SalesParmTable, SalesParmLine Table
CustConfirmJour Table, CustConfirmTrans Table- when a sales order gets confirmed.


SalesFormLetter classes will be used to post the sales order at various document status like picking,packing, invoice etc.

Picking List
---------------
Classes :- SalesFormLetter_PickingList class

 Tables :- SalesTable, SalesParm Tables

Packing List
---------------
Classes :-SalesFormLetter_PackingSlip class

Tables  :-SalesTable, Salesparm Tables

CustPackingSlipJour, CustPackingSlipTrans  when a packing slip is posted.

Invoice
---------
Classes :- SalesFormLetter_Invoice class

CustInvoiceTable, CustInvoiceTrans when invoice is posted.

Opening Form Using X++ Code in AX

There are different methods to open the form using code, follow the below methods.


Method 1:-

You can open a form with the help of single line of code.

Follow the below code to open the form :

new MenuFunction(MenuItemDisplayStr(CustTable),MenuItemType::Display).run();

The above code will open the CustTable form.

Method 2:-

If you want to open the form by passing some arguments, follow the below code

static void FormopenthroughCode()
{
   Args args = new Args();
   ;
   args.record(CustTable::find('CUS-0002'));
   new MenuFunction(MenuItemDisplayStr(CustTable),MenuItemType::Display).run(Args);
}


It will open the CustTable form and filter out the customer with account number CUS-0002.


--------------------------------------------------------------------------------------------------------------------

You can also try below method to open the form by passing an argument.
Below code will also help you to implement parent-child form functionality
For example :- If you want Parent Form to be open until Child Form is closed.

static void OpenForm ()

     FormRun formRun;
     Args args = new Args();
     ;
     args.name(formstr(CustTable));
     args.caller(element);

     formRun = ClassFactory.formRunClass(args);
     formRun.init();
     formRun.run();
     formRun.wait(); //form will wait until you close the child form.
     formRun.detach();//this will add the close button
}

Monday, April 13, 2015

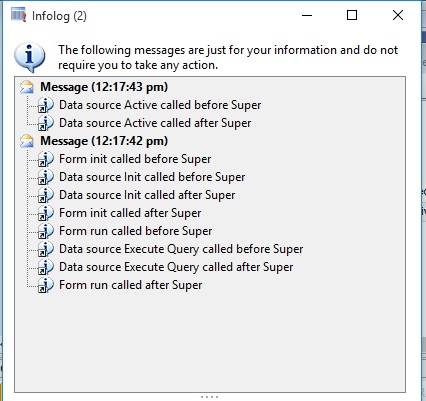
Form Method Calling Sequence in AX 2012

Form Method Calling Sequence in AX 2012

Sequence of Methods calls while opening the Form
Form --- init ()
Form --- Datasource --- init ()
Form --- run ()
Form --- Datasource --- execute Query ()
Form --- Datasource --- active ()


Sequence of Methods calls while closing the Form
Form --- canClose ()
Form --- close ()


Sequence of Methods calls while creating the record in the Form
Form --- Datasource --- create ()
Form --- Datasource --- initValue ()
Table --- initValue ()
Form --- Datasource --- active ()


Sequence of Method calls while saving the record in the Form
Form --- Datasource --- ValidateWrite ()
Table --- ValidateWrite ()
Form --- Datasource --- write ()
Table --- insert ()


Sequence of Method calls while deleting the record in the Form
Form --- Datasource --- validatedelete ()
Table --- validatedelete ()
Table --- delete ()
Form --- Datasource --- active ()


Sequence of Methods calls while modifying the fields in the Form

Table --- validateField ()
Table --- modifiedField ()


Friday, April 10, 2015

Incremental CIL and Full CIL in AX 2012

Compile: - Compile is to convert x++ source code into p-code, it is in 2009

Full CIL :-Generating CIL is about to convert the p-code into CIL, referred to as the byte code which, at run time, is used by the CLR to convert into native code for execution on the computer. It is easier to understand that a full CIL generation involves converting all p-code into CIL, finally it converts to the binary Lang

Incremental CIL :-Incremental CIL generation involves only the “changed” p-code artifacts that need  to be converted into target CIL. Incremental CIL would compile only the objects that were modified since the last incremental compilation.
Some X++ batch jobs can now complete in much less time. All X++ code that runs on the AX32.exe client still runs as interpreted p-code. However, all batch jobs now run as Microsoft .NET Framework CIL, which is often much faster than p-code.

The X++ developer must now complete the extra step of compiling X++ p-code to CIL. To compile p-code to CIL, right-click AOT, and then click Add-ins > Incremental CIL generation from X++.

Next, if the installation uses multiple instances of Application Object Server (AOS), all AOS instances must be stopped and then restarted. This causes the AOS instances to load the updated assembly.

Finally, a service or a batch job must run the X++ code that was compiled to CIL. Services and batch jobs now run only as CIL

Friday, April 3, 2015

Creating Sales Order Using X++ in AX 2012

Creating Sales Order And Posting Sales Order Invoice 

static void Esh_CreateSO(Args _args)
{
    // Create the Sales Order

    SalesTable salesTable;
    NumberSeq NumberSeq;
    SalesId sid;
    SalesLine sl;
    SalesFormLetter salesFormLetter;
    ;
    NumberSeq =NumberSeq::newGetNum(SalesParameters::numRefSalesId() , true);
    sid=NumberSeq.num();
    salesTable.SalesId = sid;
    salesTable.initValue();
    salesTable.CustAccount = "US-006";
    salesTable.initFromCustTable();
    salesTable.insert();

    //Create the Sales Line with the created Sales Order
    sl.SalesId=sid;
    sl.ItemId="A0001";
    sl.InventDimId="000458";
    sl.PriceUnit=3750.00;
    sl.SalesQty=5;
    sl.CreateLine(NoYes::Yes,NoYes::Yes,NoYes::Yes,NoYes::Yes,NoYes::Yes,NoYes::Yes);

    info("Sales Order Created with Line");
 
    //Posting Sales Order 
    salesFormLetter=SalesFormLetter::construct(DocumentStatus::PackingSlip);
    salesFormLetter.update(SalesTable::find(sid));
    salesFormLetter.update(salesTable,systemDateGet(),SalesUpdate::All,AccountOrder::None, NoYes::No,NoYes::Yes);
    info("Sales Order Status is Delivered");
 

    //Post the Sales Order Invoice
    salesFormLetter=SalesFormLetter::construct(DocumentStatus::Invoice);
    salesFormLetter.update(SalesTable::find(sid));
    info(strFmt("%1 Sales Order Posted and Final Status is Invoiced",salesTable.SalesId));

}

Thursday, April 2, 2015

Creating, Confirming, Invoicing Purchase Order using X++ in AX 2012

To Create a Purchase Order follow the below code :

static void Esh_CreatePO(Args _args)
{

PurchTable purchTable;
PurchLine purchLine;
VendTable vendTable = VendTable::find("US_TX_001"); //Specify Vendor Account which is nothing but selecting a Purchase Order
AxPurchTable axPurchTable;
AxPurchLine axPurchLine;
PurchFormLetter purchFormLetter;
;

//Create Purchase order
purchTable.initFromVendTable(vendTable);

axPurchTable = axPurchTable::newPurchTable(purchTable);
axPurchTable.parmPurchaseType(PurchaseType::Purch);
axPurchTable.parmDocumentStatus(DocumentStatus::PurchaseOrder);


axPurchTable.parmDeliveryDate(str2date("08/18/2014",213)); // Important because system check the transaction date.
axPurchTable.parmAccountingDate(str2date("08/18/2014",213));
axPurchTable.parmPurchStatus(PurchStatus::Backorder);

axPurchTable.doSave();


purchLine.initFromPurchTable(purchTable);

axPurchLine = AxPurchLine::newPurchLine(purchLine);
axpurchLine.parmItemId("A0001");
axpurchLine.parmInventDimId('000458');//important because Wherhouse, dimension location, dimension inventory status must be specified.
axPurchLine.parmPurchQty(10);
axPurchLine.parmPurchPrice(100);
axPurchLine.doSave();

//PO confirmation 
purchTable = axPurchTable.purchTable();
purchFormLetter = PurchFormLetter::construct(DocumentStatus::PurchaseOrder);
purchFormLetter.update(purchTable, strFmt("Inv_%1", purchTable.PurchId));

// PO invoicing
purchFormLetter = PurchFormLetter::construct(DocumentStatus::Invoice);
purchFormLetter.update(purchTable, strFmt("Inv_%1", purchTable.PurchId));
info(strFmt("purchase order %1 invoiced",purchTable.PurchId));

}


Run the job and check the Invoiced Purchase Order using the PurchId in the Infolog.

Wednesday, April 1, 2015

Posting Journal using X++ in AX 2012

Step 1:- Open Account Receivable | Journals | Payment | Payment journal, and find previously created
journal or manually create a new one. Note the journal's number.

Step 2 :- In the AOT, create a new job named JournalPost with the following code :

static void JournalPost(Args _args)
{
LedgerJournalCheckPost jourPost;
LedgerJournalTable jourTable;
jourTable = LedgerJournalTable::find('JN0564');
jourPost = LedgerJournalCheckPost::newLedgerJournalTable(
jourTable,
NoYes::Yes);
jourPost.run();
}


Creating Genral Journal using X++ in AX 2012

static void LedgerJournalCreate(Args _args)
{
LedgerJournalTable jourTable;
LedgerJournalTrans jourTrans;
LedgerJournalTableData jourTableData;
LedgerJournalTransData jourTransData;
LedgerJournalStatic jourStatic;
DimensionDynamicAccount ledgerDim;
DimensionDynamicAccount offsetLedgerDim;

ttsBegin;

ledgerDim =
DimensionAttributeValueCombination::getLedgerDimension(
'110180',
['Department', 'CostCenter', 'ExpensePurpose'],
['OU_2311', 'OU_3568', 'Training']);

offsetLedgerDim =
DimensionAttributeValueCombination::getLedgerDimension(
'170150',
['Department', 'CostCenter', 'ExpensePurpose'],
['OU_2311', 'OU_3568', 'Training']);

jourTableData = JournalTableData::newTable(jourTable);
jourTable.JournalNum = jourTableData.nextJournalId();
jourTable.JournalType = LedgerJournalType::Daily;
jourTable.JournalName = 'GenJrn';
jourTableData.initFromJournalName(
LedgerJournalName::find(jourTable.JournalName));
jourStatic = jourTableData.journalStatic();
jourTransData = jourStatic.newJournalTransData(
jourTrans,
jourTableData);
jourTransData.initFromJournalTable();
jourTrans.CurrencyCode = 'USD';
jourTrans.initValue();
jourTrans.TransDate = systemDateGet();
jourTrans.LedgerDimension = ledgerDim;
jourTrans.Txt = 'General journal demo';
jourTrans.OffsetLedgerDimension = offsetLedgerDim;
jourTrans.AmountCurDebit = 1000;
jourTransData.create();
jourTable.insert();

ttsCommit;
info(strFmt(
"Journal '%1' has been created", jourTable.JournalNum));
}

Vendor Payment Journal using X++ in AX 2012

static void  VendPaymJournalCreate(Args _args)
{
    LedgerJournalTable jourTable;
    LedgerJournalTrans jourTrans;
    LedgerJournalTableData jourTableData;
    LedgerJournalTransData jourTransData;
    LedgerJournalStatic jourStatic;
    DimensionDynamicAccount ledgerDim;
    DimensionDynamicAccount offsetLedgerDim;

ttsBegin;
    ledgerDim = DimensionStorage::getDynamicAccount(
    '1002',
    LedgerJournalACType::Vend);
    offsetLedgerDim = DimensionStorage::getDynamicAccount(
    'USMF OPER',
    LedgerJournalACType::Bank);

    jourTableData = JournalTableData::newTable(jourTable);
    jourTable.JournalNum = jourTableData.nextJournalId();
    jourTable.JournalType = LedgerJournalType::Payment;
    jourTable.JournalName = 'VendPay';
    jourTableData.initFromJournalName(
    LedgerJournalName::find(jourTable.JournalName));
    jourStatic = jourTableData.journalStatic();
    jourTransData = jourStatic.newJournalTransData(
    jourTrans,
    jourTableData);
    jourTransData.initFromJournalTable();

    jourTrans.CurrencyCode ='USD';
    jourTrans.initValue();
    jourTrans.TransDate = systemDateGet();
    jourTrans.AccountType = LedgerJournalACType::Vend;
    jourTrans.LedgerDimension = ledgerDim;
    jourTrans.Txt = 'Vendor payment journal demo';
    jourTrans.OffsetAccountType = LedgerJournalACType::Bank;
    jourTrans.OffsetLedgerDimension = offsetLedgerDim;
    jourTrans.AmountCurDebit = 1000;
    jourTransData.create();
    jourTable.insert();
    ttsCommit;
    info(strFmt(
    "Journal '%1' has been created", jourTable.JournalNum));

}

Creating Customer Payment Journal Using X++ in AX 2012


Step 1 :- In the AOT, create a new class named LedgerJournalTransData with the
following code:

class LedgerJournalTransData extends JournalTransData
{
}

Step 2 :- public void create(
boolean _doInsert = false,
boolean _initVoucherList = true)
{
lastLineNum++;
journalTrans.LineNum = lastLineNum;
if (journalTableData.journalVoucherNum())
{
this.initVoucher(
lastVoucher,
false,
_initVoucherList);
}
this.addTotal(false, false);
if (_doInsert)
{
journalTrans.doInsert();
}
else
{
journalTrans.insert();
}
if (journalTableData.journalVoucherNum())
{
lastVoucher = journalTrans.Voucher;
}
}


Step 3:-Open the LedgerJournalStatic class, and replace its newJournalTransData() method with the following code:

JournalTransData newJournalTransData(
JournalTransMap _journalTrans,
JournalTableData _journalTableData)
{
return new LedgerJournalTransData(
_journalTrans,
_journalTableData);
}


Step 4:-Create a new job named CustPaymJournalCreate, with the following code:

static void CustPaymJournalCreate(Args _args)
{
    LedgerJournalTable jourTable;
    LedgerJournalTrans jourTrans;
    LedgerJournalTableData jourTableData;
    LedgerJournalTransData jourTransData;
    LedgerJournalStatic jourStatic;
    DimensionDynamicAccount ledgerDim;
    DimensionDynamicAccount offsetLedgerDim;
 
ttsBegin;
    ledgerDim = DimensionStorage::getDynamicAccount(
    'US-001',
    LedgerJournalACType::Cust);//Account 
    offsetLedgerDim = DimensionStorage::getDynamicAccount(
    'USMF OPER',
    LedgerJournalACType::Bank);//OffsetAccount
 
    jourTableData = JournalTableData::newTable(jourTable);
    jourTable.JournalNum = jourTableData.nextJournalId();
    jourTable.JournalType = LedgerJournalType::CustPayment;
    jourTable.JournalName = 'CustPay';//Payment Journal Name
    jourTableData.initFromJournalName(
    LedgerJournalName::find(jourTable.JournalName));
    jourStatic = jourTableData.journalStatic();
    jourTransData = jourStatic.newJournalTransData(
    jourTrans,
    jourTableData);
    jourTransData.initFromJournalTable();
 
    jourTrans.CurrencyCode ='USD';
    jourTrans.initValue();
    jourTrans.TransDate = systemDateGet();
    jourTrans.AccountType = LedgerJournalACType::Cust;
    jourTrans.LedgerDimension = ledgerDim;
    jourTrans.Txt = 'Customer payment journal demo';
    jourTrans.OffsetAccountType = LedgerJournalACType::Bank;
    jourTrans.OffsetLedgerDimension = offsetLedgerDim;
    jourTrans.AmountCurDebit = 1000;
    jourTransData.create();
    jourTable.insert();
    ttsCommit;
    info(strFmt(
    "Journal '%1' has been created", jourTable.JournalNum));
 
}

Output :- 


How to enable the dimension fields based on the Item selected on the form.

[Form] public class KMTShipFromWarehouses extends FormRun {     InventDimCtrl_Frm_EditDimensions        inventDimFormSetup;     /// &l...